
If you have ever had problems with your sink faucet leaking, wobbly faucet, or a loose kitchen faucet, then this article is for you. Here we explain exactly how to tighten sink faucet.
What Causes Loose Faucets?
One of the main reasons faucets often loosen is when the nut holding them in place gets loose. This loosening is caused by damage and corrosion to the threads that hold the nut in place. Corrosion occurs when water sits for long periods of time in pipes. It forms minerals like calcium carbonate which hardens into rock-like deposits. These mineral deposits can block up the holes where the screws go through the pipe walls. In this case, you need to replace both the washer and the faucet body. You should also check all other connections between the faucet and its plumbing system. For example, if you have a spout attached to the side of the sink, make sure it isn’t leaking. Also, look at any valves along the way. They’re often hidden behind cabinet doors so they aren’t visible until something goes wrong. Make sure you don’t forget about the drain line too. Ensure it doesn’t leak either.
There are a multitude of other reasons why a faucet may become loose. Another common reason is that the washer has worn out and needs replacing. If you have an older home with cast iron or porcelain sinks, it’s possible your old washers could wear down over time. This can cause leaks in your kitchen sink.
A loose or broken faucet can cause a lot of problems. If you have a leaky faucet it could lead to water damage in your home and even mold growth if the problem is not fixed quickly enough. The most common reason for a leaking faucet is that there are cracks in the pipe where the washer meets the stem. This allows air into the system which then creates pressure on the inside of the pipes causing them to expand outwards. When this happens they push against each other creating gaps between the two pieces.
These leaks usually happen at the base of the spout because when the faucet is turned off the weight of the water pushes down onto the top piece forcing it up and away from the wall. Once the faucet has been shut off these small gaps allow air back into the system allowing more pressure to build up until eventually the whole thing bursts open. Another way that a faucet may become loose is by corrosion. Over time rust builds up around the threads making them weaker than normal. Eventually the threads break free from their moorings and the faucet becomes loose. There are many different ways that a faucet can get damaged but one of the easiest ways to fix is with a new replacement part. You just need some basic hand tools like pliers and wire cutters along with an adjustable wrench.
What Tools Do I Need to Tighten Sink Faucet?
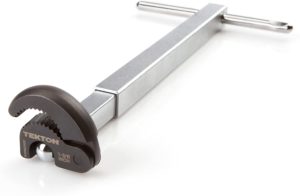
- Basin wrench – used to loosen/tighten nuts & bolts
- Flashlight – Used to see inside pipes and see under the sink, you will use it to locate the nut you’re going to tighten
- Pliers – Used to remove screws with damaged thread
- Adjustable Wrench – Used to turn nut & bolt heads
- Hex head wrench – Used to adjust hex head screw
- Flathead screwdriver – Used to drive in and unscrew flathead screws
The first step is to remove all parts except the handle itself. Remove any screws holding the old valve assembly together as well as any nuts used to hold the handles in place. Next use a pair of channel lock pliers to grip both sides of the nut closest to the handle so that you don’t accidentally loosen it while tightening the rest of the bolts. Use the same tool to turn the bolt counterclockwise slowly working towards loosening it. It should take about 5-10 turns before the bolt starts coming undone. Now repeat the process using another set of channel lock pliers gripping the opposite side of the nut. Continue turning the bolt clockwise until it comes completely apart. Be careful not to overdo it though since you want to keep the head of the bolt intact. After removing the last bolt simply pull the entire assembly out of its housing. Take note of the position of the holes in the bottom plate and make sure that they line up correctly with those in the mounting bracket. Also check to see if the hole in the center of the handle matches up with the hole in the middle of the mounting bracket. If everything lines up properly replace the handle and reattach the remaining hardware. Make sure to put a good amount of grease on the threads of the bolts before putting the new handle back in place.
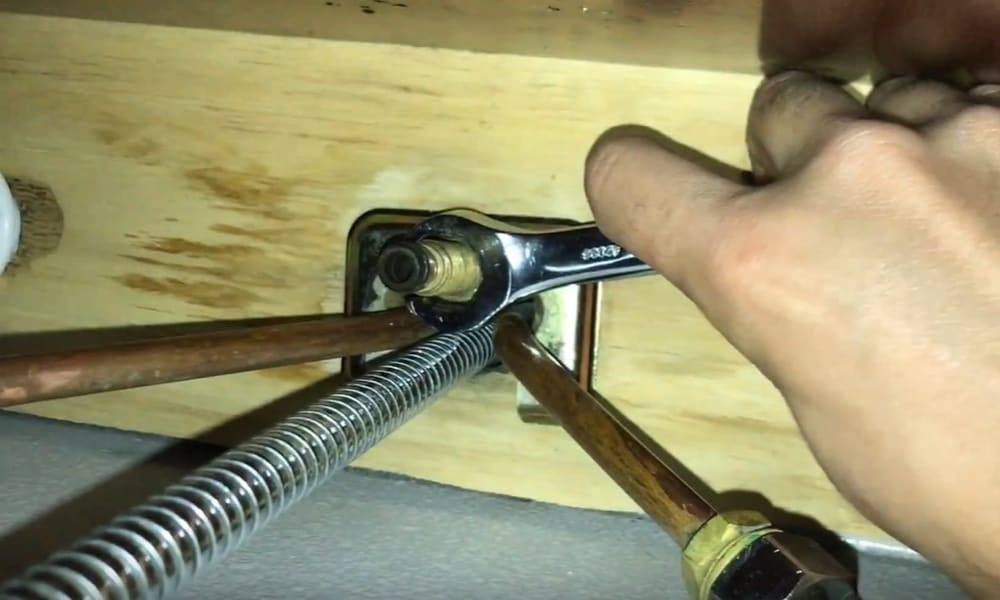
How Do I Tighten The Nut Under the Kitchen Sink Faucet?
Start by locating the water valves under the sink, go ahead and turn them off – unless you want a lot of water splashing in your face.
Now get down under the sink and use the flashlight to find the nut & bolt, 99% of the time this will be located right underneath where the faucet is.
Now with the basin wrench, adjust the wrench to the size of the nut & bolt, grip the nut and begin turning in a clockwise direction.
Tighten the nut until it stops, don’t try forcing it to go any further – if you do you will cause damage.
Check this helpful video for a visual step-by-step process.
How To Replace O Ring In Sink Faucet?
Leaky sinks can be fixed by replacing the rubber O ring rubber seal inside the spout. This simple repair works every single time and takes less than five minutes to complete. We recommend doing this whenever there is even slight leakage from the spout because once the O ring gets wet it becomes very difficult to get it replaced. The best way to avoid having to deal with this problem again is to just follow these steps when installing your new faucet:
- Turn off the cold water supply line, do this by closing the water supply valves
- Unscrew the existing fixture.
- Pull the hot water pipe away from the wall
- Disconnect the shutoff valves at each end of the piping system
- Remove the old O ring, place the new O ring
- Reinstall the hot water pipe and push it back towards the wall, now reconnect the shutoffs.
- Turn on the cold water now wait ten seconds and turn on the hot water
- Check for leaks
How Do I Prevent Loose Faucets?
There are several things that you can do to help keep your faucet tight over time. First make sure that all of the parts are tightened properly before turning the handle. Make sure that the washers are snugly fit into place so that no gap exists between the washer and the stem. Also check to see if any of the seals are worn out or missing completely. Finally use only quality plumbing supplies such as brass fittings instead of plastic or aluminum. Brass lasts longer and holds its shape better than cheaper materials. It also doesn’t corrode easily so it won’t wear out prematurely.
There are several things that you can do to help ensure that your faucet stays tight. First of all never leave the house without taking your faucet off! Leaving the faucet running while you’re gone leaves behind a pool of standing water that attracts insects and bacteria.
How Can I Prevent My Kitchen Sinks From Leaking Water?
If you want to avoid having leaks in your sinks, then you should make sure that all of the components inside your sink are working properly. You don’t necessarily need to spend money on expensive products; instead, you just need to use common sense when fixing problems like leaky pipes. For example, if you notice that your bathroom floor is wet after using the toilet, then you know that something needs to be fixed. It doesn’t matter whether you live in a house built more than 50 years ago or one that was recently constructed – you still need to check things out so that you won’t experience similar issues later on.
How Much Does it Cost to Repair Or Tighten Sink Faucet?
If you only need to tighten your faucet, you essentially only need a basin wrench and a flashlight – and not even that if the lighting is good. If you already have these things it will cost nothing, if you don’t have them you can pick them up from a local hardware store for under $60. If you need to buy some replacement parts such as an O ring, that will cost you less than $20, but unless you have the confidence in your skill to install it, you may need to hire a professional plumber, which the costs of vary. In short for DIY expect to pay less than $100.